Peer review is notoriously challenging to facilitate, especially if some or all of your students attend virtually. While it would be nice to simply have students trade physical copies of their papers, it’s not always possible!
For two semesters, I used Canvas’ built-in peer review system. While I never had technical difficulties with it, MANY of my colleagues report it being a nightmare to work with. When I switched assignment submission in my classes to Google Assignments, it only made sense to find a way to use Google Drive to support peer review, too!
In this post, I’ll share my system with you & some of the automation that makes it easy!
Using Google Docs for Peer Review
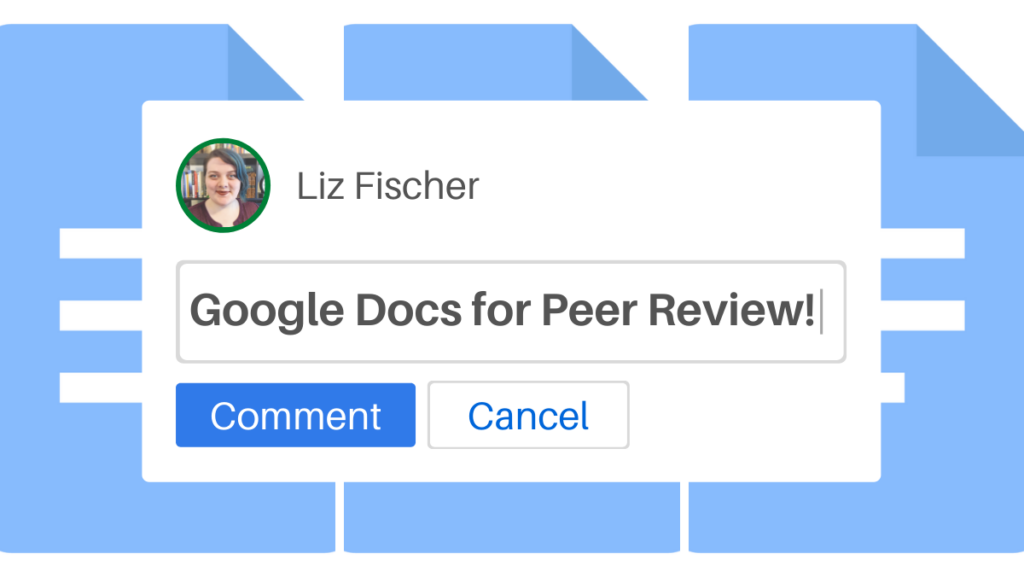
I looooove Google Doc’s suggestion features! I find it way easier to use than Track Changes & Comments in Word, and much more user-friendly than Canvas’ Speed Grader. Since I use Google Docs to give students feedback, I devised a way to facilitate peer review through Google Docs too.
NOTE: Make sure for all of this, you’re using your university Google account, and that your university uses Google Workspace for Education. Normal Google Drive isn’t FERPA compliant, but the education suite is!
Basic structure
To run peer review, you need to split students into groups & give each person in the group a copy of each other person’s paper. Easy with physical paper, tedious with digital files, but here’s basically how I do it:
- Everybody submits their paper as a Google Doc (or word file)
- I split students into groups of 4
- I make a folder for each group.
- Each group folder contains 4 folders, one for each student.
- Each student’s folder contains 4 copies of their paper, one for Reviewer 1, one for Reviewer 2, etc.
- During class, each student adopts a reviewer number & leaves feedback for each other member of their group.
I won’t lie, the first couple times I did this, it took ages. But now that I have pieces of the workflow automated, it makes me maybe 20 minutes to set up a group of 25 students. Sure, that’s more than it would take to just make groups & say “figure it out,” but I’ve found the quality of feedback students leave is worth the effort on my part.
Why the “Reviewer N” system?
If you were doing hard-copy peer review, you’d ask each student to bring group-size-minus-one copies of their paper to class. Here, we’re going to make group-size copies of each file instead. You may wonder, why group-size and not group-size minus one? If I have groups of four, only three people are reading each paper! Here’s why: In class, I ask students to assign themselves a reviewer number. I use groups of four, so that’s 1-4. Each student sticks with their reviewer number for all the papers they read. So if Jim is Reviewer 1 on Avery’s paper, he’ll be Reviewer 1 on Julian and Sam’s papers, too. But for Jim’s paper, there won’t be a Reviewer 1, so that copy will just go unused.
This leads to a lot less confusion and a lot more flexibility on the day of peer review if you need to shuffle groups around than having only 3 copies of each paper. Instead of having students awkwardly figure out which copy of a document hasn’t been used already, they know exactly which files to work in. Instead of having to rename files if you have to switch groups around, you can just move a folder.
Automation
So, the end goal here is to have one copy of each students’ paper for each member in their peer review group that their peers can use to leave comments and suggestions. Now obviously copying & renaming each paper by hand sounds like a NIGHTMARE, so I use a little bit of Python housed in a Google Colab Notebook to help me.
Colab makes it really easy to share & run code, even if you know nothing about programming. You can make a copy of my code for yourself! (Go to File > Save a copy in Drive). The instructions in that Colab notebook supplement & parallel the instructions here, so you can use it and follow along!
The Whole Workflow, In Detail
Students submit their drafts
This method can work with almost any digital assignment submission process you currently use.
If you, like me, use Google Assignements’ Canvas integration, when students submit their draft it’ll end up in a folder in your Google Drive. To find them, navigate to Assignments > [Class Name] > [Assignment Name].
If you usually have students submit a .doc/.docx to your LMS, you can download all the assignments from there & upload them to Google Drive in the next step.
You can also have students submit a link to a Google Doc, either through your LMS or via email.
Or, if you’re feeling really brave, you can complete the next step first and ask each student to upload their own paper to the folder you’ll create for them!
Set up peer review folders
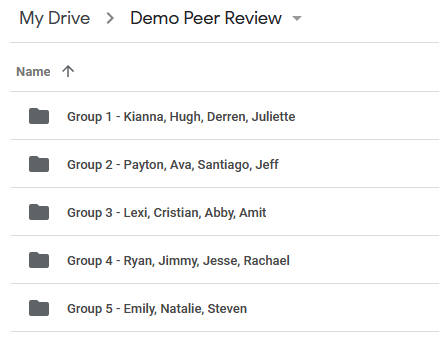
Once I’ve located all the submitted papers, I create a folder in my Google Drive called [Assignment Name] Peer Review. Within that folder, I make a folder for each peer review group and add the names of each group member to the folder name. For example: “Group 1 – Kianna, Hugh, Derren, Juliette” (all student names in these examples are fictional!)
Once I’ve made the groups, I run the first part of the script in Colab to create a sub-folder for each student within their group.
You could also do this by hand, but it’d take a while if you have more than a few students!
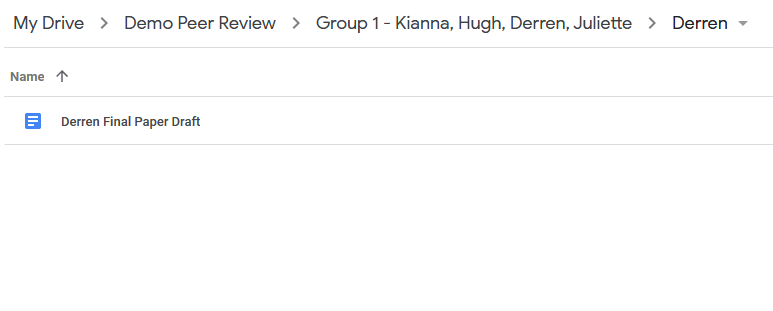
Now each group folder should contain a folder for each student, like this:

At the end of peer review, each student will look in the folder with their name on it to find feedback from their peers.
Move submitted papers to the right folder
This step varies, depending on how you had students submit their papers. You want to get each student’s paper into the folder with their name on it.
If you had them submit via Google Assignments, you can drag each paper to the right location from within Google Drive as usual.
If you had them send you a Word doc, upload each to the appropriate folder by clicking & dragging.
Or, if you had them submit Google Doc links, you may need to add a copy of their doc to the Drive folder with their name on it. With their paper open, go to File > Make a Copy & select the folder you created in the previous step.
Whichever way you do this, I find it’s fastest to upload/move all the papers into the main Peer Review folder first. From there, drag each groups’ papers into the group’s folder, then go in each group folder and drag each student’s paper into their named folder.
If you were brave & had students upload their papers to these folders themselves, just double check that everything got where it needed to get.
Generate copies for peer reviewers
Next, we need to make a few different copies of each paper so that each reviewer can leave their comments without being affected by what others have said.
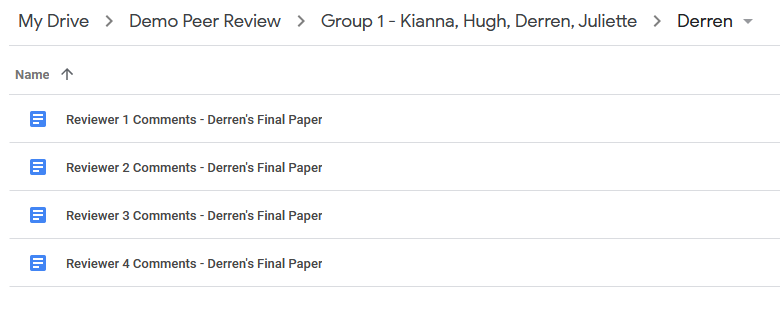
First, I run the section that renames each student’s paper to the format we want– “Reviewer 1 Comments – [Name]’s [Assignment Name]”. The result is each student’s folder looks something like this:

Then I run the section that creates copies of the paper & changes the reviewer number. After, each student’s folder looks like this:
Share
Last pre-class step is to share the peer review folder with the class. You can either share it with the specific emails of your class or change it to “anyone in this group with the link”. Set permission to Commenter.
I’ll be honest, I’ve usually done “anyone with the link” and talked to my students about not sharing other people’s work outside of the class, then locked the permissions back down after peer review is finished. This might not be the best student privacy practice, so I recommend adding your students’ university emails instead.
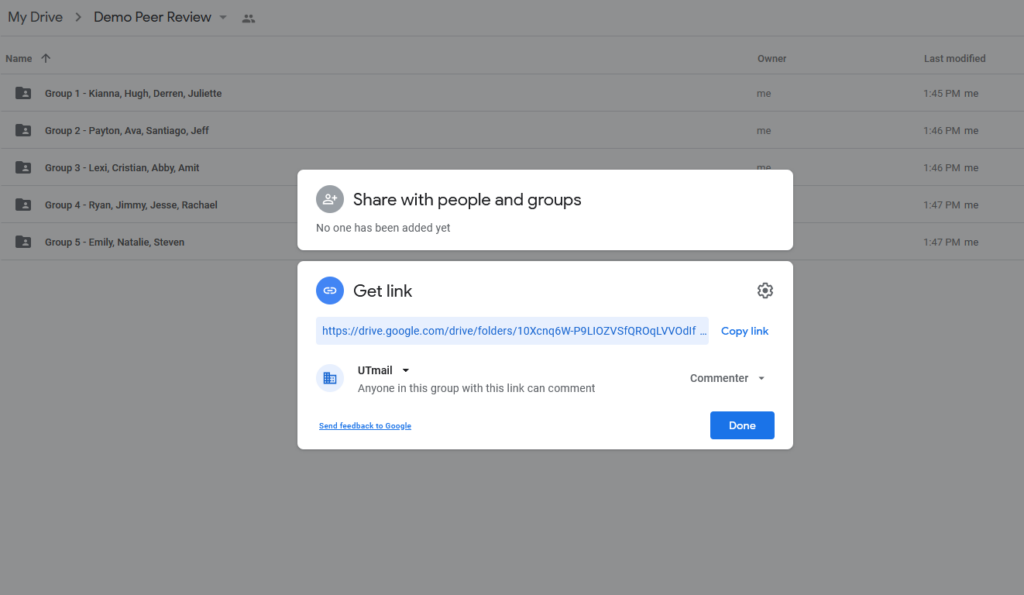
Whichever way you share, add a link to the folder somewhere easily accessible so students can find it during class!
In class
During class, I walk students through how to find their group’s folder and ask them to sit with their group. Within each group, each student picks a reviewer number and comments on those papers. I’ve never had much trouble with them understanding this once they’re looking at the actual folders.
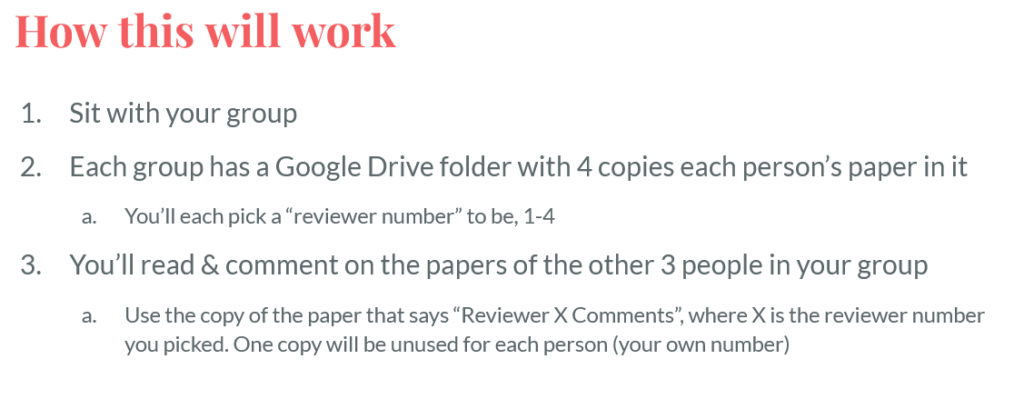
The first time we do peer review this way, I show students how to use Google Docs to comment on, suggest changes to, highlight, etc. their peers’ papers.
Results
I’ve used this system for over a year now and like it a lot! I emphasize feedback above all else in my classes, so I like that this peer review system gives students access to the same tools I use to give feedback. I also love that I can see what comments have been left on papers. While I can’t be certain, I’m pretty sure this has led to an uptick in the quality of feedback people are leaving for their peers. Since switching to Google Docs, I’ve had more students report they found the peer review process helpful than I did before. That’s a win!

Leave a Reply